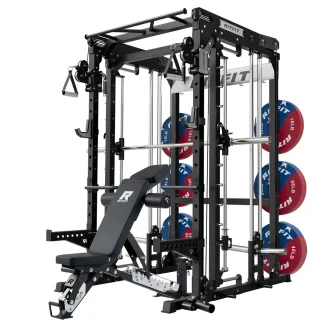
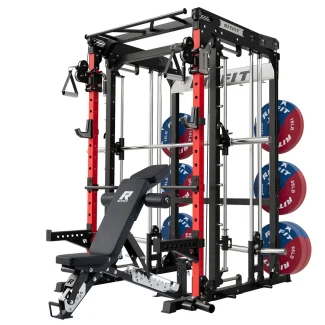
 When you set up a home gym, you usually have to make the most of a small space. You need room for squats, presses, cables for smaller muscles, and maybe a pull-up bar. The RitFit M2 3D Smith Machine Package puts all these features into one machine. Its standout feature is a Smith bar that moves up and down and forward and back.
This all sounds useful, but what does it really mean for your workouts? How much space and equipment will you need to use it well? Let’s break it down.
A Smith Bar With More Room to Move
A regular Smith machine only lets the bar move up and down. The M2 3D also lets the bar move forward and back, but only within a certain range. This extra movement can help you follow a more natural path for presses, rows, and other lifts. The bar stays attached to the frame, so it still feels different from a free-weight barbell.
You can also use the power rack for barbell exercises outside the Smith system. That means you can choose the guided bar or a free-weight lift, depending on your workout.
More Than a Smith Machine
The M2 3D also includes a plate-loaded cable crossover, pull-up station, low row, and landmine. You can move from rack squats to cable flyes, rows, curls, or landmine presses without needing a different machine for each exercise. This setup works well for anyone who wants to train their whole body at home.
Keep in mind that the cables use weight plates. The standard M2 3D does not have built-in weight stacks like the M2 Pro 3D. You’ll need to use your own plates for cable exercises and adjust the weight by adding or removing plates, not by using a selector pin. If you already own Olympic plates, this setup could be a good fit. If you want to change weights quickly, compare both models before you buy.
Check Your Room—and Your Bundle
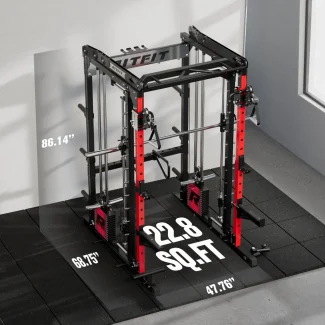
RitFit says the M2 is 78.7 inches long, 68.75 inches wide, and 86.14 inches high. Measure more than just the frame. Leave space to load plates, move a bench, use the cables, and do pull-ups. Also, check your ceiling height if you plan to use the pull-up bar.
The package contents can also vary. This review covers the RitFit M2 3D Smith Machine with a GATOR bench and a 370-lb set of Olympic weight plates, but other bundles may vary. Make sure you know exactly what’s included before you order. Checking ahead can help you avoid delivery-day surprises, like needing to buy extra weights.
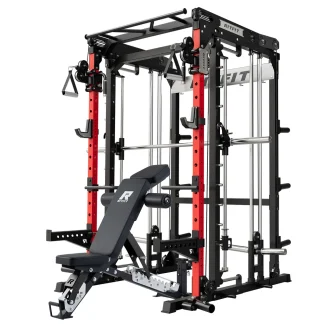
The M2 3D stands out because it combines several lifting options in one home gym, and its guided bar lets you move more freely than a regular Smith machine. The rest of this review will help you see if its features, plate-loaded design, and size fit your training needs.
Keep reading for my full review below!
Product: RitFit M2 3D Smith Machine Package
Price: For a great deal on this gym, simply go to RitFit Sports.com
Warranty: Frame Lifetime / Parts 1 year
My rating: 9/10
Affiliate Disclosure: As a RitFit Sports Affiliate Program participant, I earn commissions on purchases made through links in this post. Full disclosure
Details and Specifications
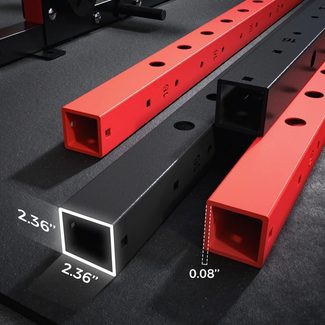
- Frame Uprights: 2.36-inch x 2.36-inch x 0.08inch, 13-Gauge Steel
- Dimensions: 78.7 x 68,75 x 86.14 H inches
- Footprint: 22.8 square feet
- Available Color: Black or Red
- Product Net Weight: Not specified. I estimate it’s between 300 and 400 lbs.
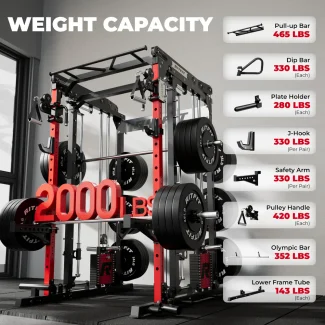
- Maximum Weight Capacity: 2000 lbs
- 1600-lb Gator Weight Bench
- 370 lbs Olympic Bumper Weight Plate Set
- Smith Bar Net Weight: 33 lbs
- J-Hooks Weight Capacity: 660 lbs
- Safety (Spotter) Arms Weight Capacity: 660 lbs
- Pull-up Bar Weight Capacity: 465 lbs
- Dip Bars Weight Capacity: 330 lbs per side
- Cable Pulley Weight Capacity: 352 lbs per side
- Cable Pulley Weight Ratio: 2:1 (100 lbs feels like 50 lbs)
- Weight Plate Storage Bars: 280 lbs each, total of 6 bars
- Cable System Rail Material: Stainless Steel
- Warranty: Frame Lifetime / Parts 1 year
RitFit M2 3D Smith Machine Package: A Closer Look at the Frame
Earlier, I talked about what the RitFit M2 3D Smith Machine Package offers for a home gym. Now, let’s take a closer look at the frame. The frame holds the rack, Smith machine, and attachments together, and its construction helps you see how it will fit your space and support your workouts.
Steel Uprights Form the Core
The M2 3D uses square steel uprights that measure 2.36 by 2.36 inches. RitFit says the wall thickness is 0.08 inches and calls the uprights 13-gauge steel. These details say more about build quality than just calling it “heavy-duty.” The uprights are the rack’s main structure and provide mounting points for accessories.
The Frame Supports More Than the Smith Bar
The M2 3D combines a power rack with a Smith machine, so its frame has several jobs. It holds the uprights and crossmembers in place, supports the guided Smith assembly, and gives you places to set rack accessories at different heights.
RitFit says the uprights have 1-inch holes and the fly attachment uses 0.39-inch holes. There’s a safety bar with triangular support and extra holes for accessories. The J-hooks have a layered design with an extra 3 mm steel plate. These small details matter because they affect how you use attachments and where you can put them.
Built Around a Moving Smith Carriage
A regular Smith bar only moves up and down. On the M2 3D, the bar moves up and down and forward and back along its guided track. This extra movement gives you more room to follow your natural bar path during lifts.
The moving parts are separate from the rack’s steel uprights. RitFit says the M2 carriage uses a heat-treated stainless steel shaft, and the cable system uses stainless steel rails. The 3D Smith machine has 10 adjustable positions. In short, the frame gives structure, and the carriage lets you move the bar in a guided way.
Check the Fit—and the Right Load Rating
The M2 frame is 78.7 inches long (including the Smith bar), 68.75 inches wide, and 86.14 inches high. When you plan your space, measure the full size, not just the footprint. Also, make sure you have enough room to load plates and move around the machine easily.
RitFit says the M2 series can hold up to 2,000 pounds. But not every part of the rack can handle that much weight. The safety arms, J-hooks, pull-up bar, and plate storage bars each have their own limits. Always check the rating for the part you’re using instead of assuming the frame’s maximum applies to everything.
The RitFit M2 3D Smith Machine Package uses strong square steel uprights and adds the mounting points and moving parts you need for a flexible home gym. Before you buy, measure your space using the full dimensions and check the load rating for each attachment you plan to use.
RitFit M2 3D Smith Machine Safety Features: What to Know Before You Lift
The RitFit M2 3D Smith Machine Package brings together a guided bar, a power rack, and other training stations. Its safety features can make solo workouts feel safer, but you still need to set up the machine properly and lift carefully.
Here’s how the main features work, including the adjustable safety stop catches and lockout pegs.
A Guided Bar with More Room to Move
The M2 3D bar moves vertically and can travel forward or backward within a controlled range. The bar stays attached to the machine, which helps guide its path while allowing more movement than a traditional Smith machine.
Even with this guidance, the bar isn’t a free weight, and you still need to control each rep. Before you add plates, move the empty bar through the range you plan to use. Make sure your stance, bench, and body are clear of the frame. RitFit says the M2 3D bar has 10 adjustable positions.
Adjustable Safety Stop Catches
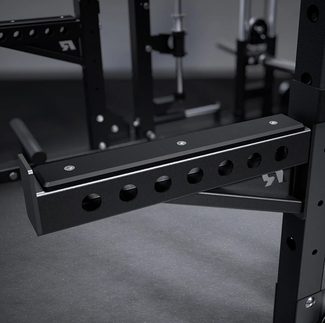
The adjustable safety stop catches act as a backup if you can’t finish a rep. Set them just below the lowest point you can reach with control. If a rep stalls, the catches help stop the bar from going too far down.
Adjust the catches for each exercise. The right height for squats might not work for bench presses or rows. Test the bar path and catch height with an empty bar first, then add a light weight you can handle.
Lockout Pegs for a Secure Finish
The lockout pegs let you secure the Smith bar when you finish a set. The bar has built-in hooks. During a squat or press, you can quickly turn your wrist to hook the bar onto the nearest frame peg.
Practice hooking the bar with no plates first. Make sure both sides catch before you step away or change your grip. Use a controlled motion when locking out. Don’t let the bar drop, and don’t assume it’s engaged without checking both sides.
Safety Arms for Rack Exercises
The M2’s adjustable safety arms back up free-weight rack exercises. Set them just below the lowest point you can reach with control. If you can’t finish a rep, the arms help stop the bar from dropping too far.
RitFit says the safety arms can hold up to 660 pounds. This is a component rating, not a recommended working load or a guarantee the arms will catch every failed lift. Make sure the arms are fitted securely, test their height with an empty bar, and check that they work for your exercise before adding weight.
J-Hooks for Rack Lifts
The J-hooks hold a barbell at the starting height you choose for rack exercises. RitFit says each J-hook can hold up to 330 pounds per side.
Make sure both hooks are set securely in the uprights and at the same height before you load the bar. Test lifting the bar off and putting it back with a light weight first. For lifts where you might need extra safety, set the safety arms below your range of motion. J-hooks hold the bar at rest, and safety arms catch it if you miss a rep.
Check the Ratings on Each Part
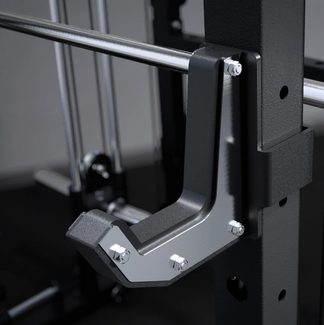
RitFit says the M2 series frame can handle up to 2,000 pounds. However, each part, such as the safety arms, J-hooks, pull-up bar, and pulleys, has its own rating. The frame’s limit does not mean every attachment can hold that much weight.
Always use the rating for the part you’re using and follow the instructions for your setup. If you are not sure about a rating, ask RitFit before adding weight.
Inspect the Machine Before Each Workout
Check all bolts, hooks, rails, cables, safety catches, lockout pegs, and attachments before you start lifting. Make sure everything is secure and works properly. If you notice damage, wear, or a part that will not lock or move correctly, stop using the machine.
RitFit’s manual advises users to keep children and pets away, inspect and tighten parts before use, and replace defective components before using the equipment again.
Leave Room Around the Rack
The M2 series takes up 22.8 square feet, but you will need extra space around it. Leave room to load plates, move a bench, use attachments, and walk around the frame. Keep the area clear so you can enter and exit safely.
A Safer Workout Starts Before the First Rep
The RitFit M2 3D guided bar, adjustable safety stops, lockout pegs, and re-racking hooks help you train safely at home. For best results, check the machine, set up each safety feature for your exercise, practice the bar path, and add weight slowly.
Spend a few minutes testing your setup before each new lift. This habit helps you train with more confidence and less doubt.
How the 3D Smith Machine Works on the RitFit M2 Package
Let us look at what makes the M2 3D special: its 3D Smith machine. A standard Smith machine moves the bar along a fixed path. The RitFit M2 3D lets the bar move forward and back as well as up and down. This gives you more options to find a comfortable position for squats, presses, and rows, while the bar stays attached to the frame.
What Does “3D” Mean on the RitFit M2?
“3D” refers to how the Smith bar moves. It goes up and down, but it can also move forward and back within the machine’s range.
When you set up for a squat on a fixed-path Smith machine, you have to fit your body to the bar’s set path. With the M2 3D, you can adjust the bar position to suit you. This also helps when setting up for a bench press or finding a good starting spot for a row.
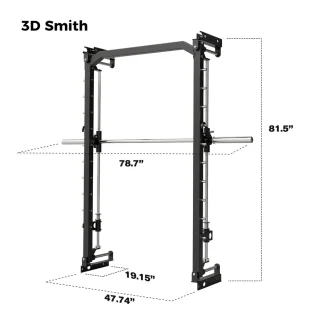
The bar is not completely free like a regular barbell. The rails still guide it, so you need to learn how and where to rerack it. You get a less rigid path, but not unlimited movement.
Why Does Front-to-Back Travel Matter?
Your body moves differently in each exercise. Stance, grip, and position all change where the bar feels best. The M2 front-to-back movement lets you adjust before a rep and gives you some extra room during the lift.
Guided Movement Still Calls for Good Form
People like Smith machines because the frame guides the bar. The M2 3D keeps this guided feel, even with the extra front-to-back movement. It also has rack points so you can secure the bar between sets.
Before adding weight, move the bar through the range without any plates. Find the rack points, set the safeties for your exercise, and make sure you can finish a rep and secure the bar from your position. Then add weight slowly.
Just because the bar is guided does not mean it is risk-free. Keep your reps controlled, follow the equipment instructions, and stop if any movement causes pain.
How the 3D Smith Fits Into the M2 Package
The Smith station is just one part of the RitFit M2 home gym. The M2 frame also includes a power rack, cable crossover, pull-up station, low row, and landmine. This lets you combine Smith machine exercises with other strength training.
Check the exact package details before you buy or plan your workouts. Both the M2 3D and M2 3D Stack have the 3D Smith bar, but the Stack version adds selectorized cable weight stacks. These stacks do not load the Smith bar; you load the Smith bar with plates.
In short, the RitFit M2 3D Smith machine lets the bar move up and down and forward and back. This extra movement can help you find a comfortable setup for squats, presses, and rows without needing a free barbell.
Start by trying the movement with an empty bar. Once you understand how it moves and how to rerack it, you can decide how to use the 3D Smith station in your workouts.
RitFit M2 3D Smith Machine Cable System: How It Works and What You Can Do
The RitFit M2 3D Smith Machine Package gives you more than a guided bar and power rack. Its cable system adds a flexible training option. Here is what you should know about the M2 3D cable pulley system, including its 2:1 ratio and plate-loaded design.
What kind of cable system does the RitFit M2 3D use?
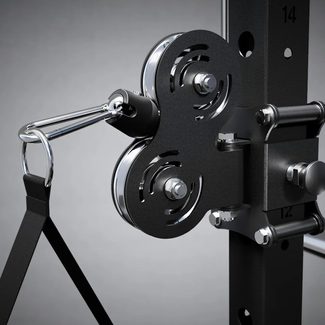
The M2 3D has a plate-loaded cable system with a 2:1 pulley ratio. Put simply, the cable at the handle moves about twice as far as the weight, so the handle feels lighter than the weight you load.
For example, if you load 20 pounds, it will feel like about 10 pounds at the handle, not counting friction or other factors. This makes the system good for controlled accessory work and longer cable movements. The 2:1 ratio is only for the cables, not the Smith bar, which works separately. RitFit says the cable system uses stainless steel rails and has a static pulley capacity of 352 pounds per side.
Plate-loaded resistance: what to expect
The M2 3D’s cables use weight plates instead of built-in stacks. You add plates to the weight carriage and change resistance by adding or removing weight. This works well for home gym owners who already have plates and want to use them across different stations.
The trade-off is that plate loading takes longer than using a selector pin. If you want to switch quickly between exercises or use drop sets, the M2 Pro 3D built-in stacks might be easier. RitFit separates the plate-loaded M2 3D from the Pro 3D, which has dual 143-pound stacks. Check the package details before you order, since the M2 series offers different cable-loading options. (RitFit M2 package configurations)
How the 2:1 pulley ratio affects your workout
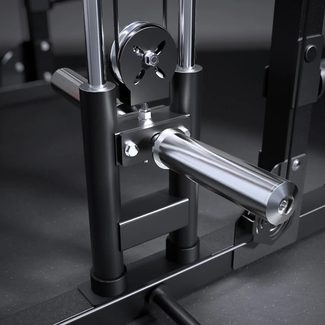
A 2:1 ratio matters when you choose your starting weight. The pounds loaded on the machine do not equal the resistance you feel at the handle. With this ratio, the handle resistance is roughly half the loaded weight. The lighter feel makes small, controlled movements easier, and the longer cable travel lets you use a full range of motion.
For heavier cable work, you might need to load more weight than you would on a 1:1 system to get the same feel. Actual resistance can vary with cable routing and friction, so use the weight that lets you move smoothly while maintaining good form.
The cable system and 3D Smith bar are separate
The name “M2 3D” refers to the Smith bar’s ability to move vertically and horizontally. That guided bar and the cable pulley system serve different purposes: use the Smith bar for guided barbell movements, and use the cables for pulling, pressing, and isolation exercises.
Keeping the two systems distinct makes the specs easier to read. The cable 2:1 ratio doesn’t apply to the Smith bar, and you shouldn’t treat the machine’s overall frame capacity as the capacity of an individual cable or attachment.
Is the RitFit M2 3D cable system right for you?
The M2 3D cable pulley system can be a good fit if you want a plate-loaded cable station built into a multi-use home gym and already own compatible plates. It supports a range of accessory exercises while sharing space with the rack and Smith machine.
If fast resistance changes matter more than using your own plates, compare it with the M2 Pro 3D. That version pairs the 3D Smith system with built-in dual weight stacks. Either way, confirm the exact package configuration and included accessories before you buy, since the M2 series offers several versions.
RitFit M2 3D Smith Machine Package: Bench, Plates, and More Ways to Train
The RitFit M2 3D Smith Machine Package pairs the rack with a Gator Weight Bench and, in the 370-lb option, a full set of Olympic bumper plates. It also brings several workout stations into one home gym: pull-up bars, dip bars, and a landmine. Here’s what each component adds to your training.
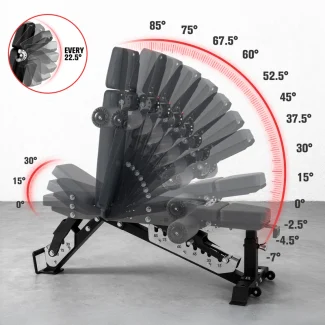
Gator Weight Bench: Adjust for the Exercise
The Gator bench supports flat, incline, and slight decline work. Set it flat for bench presses, raise the backrest for incline presses, or adjust the seat and headrest to find a comfortable position for seated exercises.
The bench has 10 backrest angles from 0 to 85 degrees, three seat angles, five headrest settings, and three slight decline settings. It weighs 109.1 lb and has a listed total load capacity of 1,600 lb. Its reinforced steel frame and padded backrest and seat make it a versatile fit for presses, rows, curls, and other strength exercises.
The decline settings are modest, so keep that in mind if you want a steeper decline. Before lifting, lock the bench in place and make sure it lines up with the bar and safety arms.
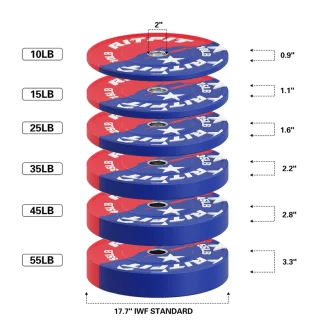
370-Lb Olympic Plate Set: Six Pairs to Load
Our setup includes the 370-lb plate option, which gives you six pairs: 10, 15, 25, 35, 45, and 55 lb. The total includes all plates in the set, not the weight loaded on a bar at once.
The plates have 2-inch holes for Olympic-sized bars and are 17.7 inches in diameter. The rubber construction helps reduce noise during handling. With six plate sizes, you can add weight in steps that fit your workout instead of relying on just a few heavy plates.
Load both sides evenly, secure the plates with collars, and make sure the bar has enough sleeve space for the plates you want to use.
Pull-Up Bars for Bodyweight Training
The M2 frame includes a pull-up station, so you can do bodyweight pulling exercises without extra equipment. Pull-ups and chin-ups work your back and arms, and hanging from the bar helps build grip strength.
RitFit says the pull-up bar can hold up to 465 pounds. Do each rep with control, and make sure the area around you is clear before you start.
Dip Bars for Pressing Work
The package includes dip bars for bodyweight exercises. Dips target your chest, shoulders, and triceps, depending on how you do them. Move with control and choose a range of motion that feels comfortable for your shoulders.
RitFit rates each dip bar to hold up to 330 pounds per side. Always check that each bar is locked in place before using it.
Landmine Attachment for Angled Barbell Moves
The landmine station holds one end of a barbell, letting you train along an angled path. You can use it for landmine rows, presses, and rotational moves. This gives you an option different from regular barbell or Smith machine exercises.
Secure the bar in the landmine attachment and check that you have enough space to move. Begin with a light weight until you are comfortable with the movement.
One Package, Several Ways to Train
With the Gator bench and plate set, you can do barbell and bench exercises. The pull-up and dip bars add bodyweight options, and the landmine lets you use the barbell in new ways. These features give you more choices without needing extra equipment.
When ordering, choose the M2 3D setup with the Gator bench and the 370-pound plate option. RitFit notes that the package arrives in several boxes, so double-check your selection and what’s included before completing your order.
Full-Body Workouts on the RitFit M2 3D Smith Machine Package
This section continues to explore the RitFit M2 home gym. We’ll cover exercises you can do with the M2 3D and how to combine them for a balanced full-body workout.
A home gym works best when it offers variety without making things complicated. The RitFit M2 3D brings together a 3D Smith bar, power rack, cable system, pull-up bar, low row, and landmine in one setup. This lets you train your legs, chest, back, shoulders, arms, and core without switching between machines.
The key is to use each station for its intended exercise, make use of the equipment in your package, and set up each move carefully. Here are some practical RitFit M2 3D exercises and a sample full-body plan to help you get started.
Note: The exercise video is filmed using the M2 3D Pro (weight stack) configuration.
What’s Included in the RitFit M2 3D Setup?
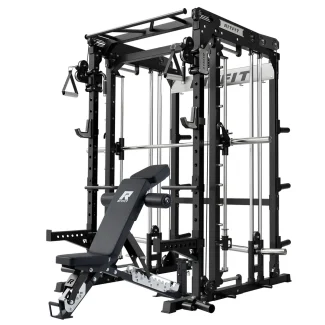
The M2 3D features a Smith bar that moves up, down, and side to side, along with a power rack and a plate-loaded cable system. It also includes a pull-up station, low-row setup, and landmine. The package comes with the GATOR bench and a 370-pound Olympic weight-plate set (See RitFit’s M2 Series package listing).
According to RitFit, the Smith bar weighs 33 pounds. The rack measures 78.7 inches long, 68.75 inches wide, and 86.14 inches high, with a 22.8-square-foot footprint. Make sure you have extra space to move the bench, load plates, and use the cables and pull-up bar.
The 3D Smith bar helps guide your movement, but it’s different from using a free barbell. If you’re new to this machine, start light and practice the bar path before increasing the load.
Lower-Body Exercises
3D Smith squat
The squat targets your quadriceps and glutes, while your trunk helps you stay steady. Set the safeties before lifting. Stand under the bar, place your feet in a comfortable position, brace your core, and squat only as low as you can while staying in control.
Keep the bar balanced over your feet, and avoid a stance that lifts your heels or shifts your back. Since the M2 3D bar can move forward and back, take your time to find a stable path.
Smith split squat
A split squat works one leg at a time and helps you balance both sides. Use the Smith bar for support, set your feet far enough apart to lower smoothly, and keep your front foot flat on the floor. Lower yourself with control, then press through your front foot to stand up.
If you’re new to this movement, start without added plates. Make sure your rear foot and the bar path have enough space before you begin your set.
Romanian deadlift
The Romanian deadlift works your hamstrings and glutes. Hold the Smith bar in front of your thighs, bend your knees slightly, and push your hips back. Lower the bar close to your legs. Stop when you feel a strong hamstring stretch, then stand up by driving your hips forward.
Start with a light weight until you can hinge without rounding your back. Set the bar and safeties at a height that lets you start and finish each rep safely.
Cable glute kickback
If you have a compatible ankle strap, attach it to a low pulley for glute kickbacks. Stand tall, hold the frame for balance, and move one leg back without arching your lower back. Pause briefly, then return with control. Repeat on both sides using the same range of motion.
The ankle strap might be an extra accessory, so check what’s included in your package before planning this exercise.
Chest, Shoulders and Triceps
Smith bench press
The adjustable weight bench lets you use the Smith bar for bench presses. Lie on the bench, set your grip and foot position, and lower the bar to your chest with control. Press it back up without bouncing or locking your arms in a painful range.
Adjust the bench and bar height before adding weight. Always use the safeties, especially if you’re training alone. The 1600-lb Gator weight bench comes with our M2 3D review setup.
Incline Smith press
Set the bench to a moderate incline for an upper-chest press. Keep your shoulders against the bench and lower the bar with control. If the setup feels awkward or the bar path doesn’t feel right, adjust the bench or pick a different press.
Cable chest fly
Set the cable pulleys at chest height and attach the right handles. Stand between the pulleys with a slight bend in your elbows. Bring your hands together in front of your chest, then slowly open your arms until you feel a comfortable stretch.
Keep your movements smooth. Don’t let the weights pull your arms back quickly at the end of each rep.
Cable lateral raise
Attach a single handle to a low pulley. Stand to the side of the cable and raise your arm out to the side, stopping at shoulder height or sooner if that feels better. Lower it slowly, then switch sides.
Use a light weight. Focus on a controlled raise, not swinging your body.
Cable triceps pushdown
Attach a handle or rope to a high pulley. Keep your elbows close to your sides and press the handle down as you straighten your arms. Return slowly, keeping your elbows from moving too far forward.
This exercise is easy to add after pressing movements. Use a weight that lets you keep your upper arms steady during the set.
Back and Biceps
Pull-up or chin-up
Use the pull-up bar for pull-ups or chin-ups. Pull-ups use an overhand grip, while chin-ups use an underhand grip. Pick the version you can do with control. If you’re not ready for full reps, try a shorter range or use a safe assistance method you can set up.
Make sure there’s enough overhead space for your head and body, and avoid swinging during the movement.
Low cable row
Attach a suitable handle to the low cable. Sit or brace yourself in a stable position, sit tall, and pull the handle toward your torso. Pull your elbows back, then extend your arms slowly without rounding your back.
The low-row station lets you do a horizontal pull, which balances out pressing and fly movements.
Cable face pull
Set the pulley at face height and attach a rope or compatible handle. Pull toward your face with your elbows out, then return slowly. Keep your shoulders down and use a weight that lets you move smoothly.
Face pulls are a good lighter upper-back exercise to do near the end of your session. Check which handles you have before adding them to your routine.
Cable biceps curl
Attach a handle to a low pulley. Stand tall with your elbows close to your sides and curl the handle toward your shoulders. Lower it slowly, keeping your body still instead of leaning back to move the weight.
Train one arm at a time, or use a bar-style attachment if your setup has one.
Core and Landmine Exercises
Cable crunch
Attach a suitable handle to a high pulley and kneel facing the machine. Hold the handle near your head and curl your ribs toward your hips. Let your abs do the work; avoid pulling with your arms.
Start with a light weight and use a small, controlled range of motion. Stop if you feel any sharp pain.
Landmine press
The landmine station lets you do angled presses with a compatible bar setup. Stand in a stable stance, hold the bar end at shoulder height, and press it forward and up. Lower it slowly, then repeat. You can work one arm at a time or use a two-handed grip, depending on your setup and comfort.
Check the attachment and bar setup before adding weight. Use a modest weight until you’re comfortable with the movement.
Landmine row
Stand facing the loaded end of the bar, hinge at your hips, and hold the bar or a compatible handle. Pull the weight toward your torso, then lower it with control. Keep your back steady and avoid jerking the bar.
Landmine rows give you another pulling option, along with the low cable row and pull-ups.
Disclaimer: I am not a personal trainer or a healthcare professional. The exercises I share work best for me and may not suit you. I recommend consulting a doctor or healthcare professional before changing your diet and fitness routine.
Tips for a Safe, Effective Session
Set the safeties before using the Smith bar for squats or presses, and make sure attachments are secure before starting cable or landmine exercises. Start with a manageable weight, move through a comfortable range, and stop if you feel sharp pain. When learning a new exercise, practice it first without heavy resistance.
The M2 3D’s movement path, cable resistance, and included accessories may vary depending on your configuration. Follow the manual for your specific model, and check your package contents before planning your workout around a certain bench, handle, or attachment.
Make the M2 3D Work for Your Goals
The RitFit M2 3D lets you do many home workouts, including Smith squats, presses, cable rows, flyes, and core exercises. Begin with exercises you like and can do well. Over the week, create a routine that works your whole body instead of trying to use every station in one session.
If you set it up well and keep making progress, this one machine can help you keep your workouts interesting in many ways.
Your Weekly Workout Plan for the RitFit M2 3D Smith Machine Package
This weekly workout plan uses the M2 3D’s guided bar, power rack, cable crossover, pull-up station, low row, and landmine. You’ll have four strength days, two lighter days, and one full rest day.
Before You Begin
Start with a five- to ten-minute warm-up with easy movement. Next, do a light practice set of your first exercise. Choose weights that let you finish each set with good form and still have a few reps left. Rest for about two minutes after big lifts and about one minute after smaller exercises.
The M2 3D bar moves both up and down and forward and back. Let it move in a way that feels natural, but remember that the guide doesn’t replace good form. Always set the catches or safety arms before you lift, and make sure the bar locks in place. If any exercise hurts, stop and make changes as needed.
Monday: Lower-Body Strength
Start the week with your biggest leg lifts. Set the bench aside so you have room to move.
3D Smith squats: 3 sets of 6–10 reps. Keep your feet planted and lower as far as you can with control.
3D Smith Romanian deadlifts: 3 sets of 8–10 reps. Push your hips back and keep the bar close to your legs.
Smith split squats: 2 sets of 8–10 reps per leg. Use a light load until you find your balance.
Standing calf raises: 2 sets of 12–15 reps. Pause at the top instead of bouncing.
Tuesday: Upper-Body Push
Today, train your chest, shoulders, and triceps. Place the bench so the bar meets your chest at a comfortable point.
3D Smith bench press: 3 sets of 6–10 reps. Keep your feet firm on the floor.
Landmine press: 3 sets of 8–10 reps per arm. Press up and slightly forward.
Cable chest fly: 2 sets of 10–15 reps. Move slowly and keep a soft bend in your elbows.
Cable triceps pushdown: 2 sets of 10–15 reps. Keep your upper arms close to your sides.
Wednesday: Easy Movement and Recovery
Let your muscles rest from heavy exercise. Take a 20- 30-minute walk, ride a bike at a relaxed pace, or do gentle mobility exercises. You should feel refreshed when you’re done, not tired out.
Thursday: Lower Body and Core
This workout gives your legs a new set of exercises, so you don’t repeat Monday’s heavy squats.
3D Smith hip thrusts: 3 sets of 8–12 reps. Set up the bench with care, press through your feet, and pause at the top.
Landmine reverse lunges: 2 sets of 8 reps per leg. Step back far enough to keep your front foot flat.
Cable pull-throughs: 2 sets of 10–12 reps. Hinge at your hips and squeeze your glutes as you stand.
Cable Pallof presses: 2 sets of 10 reps per side. Stand tall and resist the cable’s pull as you press the handle out.
Friday: Upper-Body Pull
Finish your strength work with your back and biceps.
Pull-ups or assisted pull-ups: 3 sets to as many controlled reps as you can. If pull-ups aren’t right for you yet, start with cable rows.
Low cable rows: 3 sets of 8–12 reps. Pull your elbows back without leaning or jerking.
3D Smith bent-over rows: 2 sets of 8–10 reps. Keep your torso steady and use a weight you can control.
Cable face pulls: 2 sets of 12–15 reps. Pull toward your face with your elbows high.
Cable curls: 2 sets of 10–15 reps. Keep your elbows near your sides.
Saturday: Light Activity
Pick an activity you enjoy for 20 to 40 minutes, like walking, hiking, an easy bike ride, or a relaxed stretching session. If you’re feeling sore, keep it brief. Remember, recovery is an important part of your plan.
Sunday: Rest
Take a break from planned workouts today. Use this time to check your plates, cables, handles, and bench setup so you’re prepared for Monday.
How to Make Progress Each Week
Follow this plan for four to six weeks. Once you can finish every set at the highest rep count with good form, add a little more weight next time. You can also make progress by moving more smoothly or resting less. If you’re new to lifting, start with two sets per exercise and add more as you go.
The best weekly workout plan for the RitFit M2 3D Smith Machine Package isn’t the one that makes you tired every day. It’s the one you can stick with, recover from, and do again.
RitFit M2 3D Smith Machine Assembly and Maintenance Guide
A home gym machine can really change your workouts, but you need to assemble it correctly first. The RitFit M2 3D Smith Machine Package combines a power rack, a 3D Smith system, and cable stations into one unit. Building it takes patience, a tidy workspace, and close attention to your model’s instructions.
This guide helps you plan the build, assemble the machine, check it before use, and maintain it over time. Use this as a helpful companion to the official manual, not as a replacement. RitFit also offers an M2 3D assembly video and a PDF manual on its installation guides page.
Check the Boxes and Parts First
The M2 package comes in several boxes. Wait until you have all the parts before you start building. Lay out all the pieces and check them against the parts list in the manual.
As you unpack, check the steel pieces, cables, pulleys, and hardware. If anything is missing, damaged, or doesn’t match the diagram, stop and contact RitFit support. The manual says not to use substitute parts or use the equipment if it’s not complete.
Keep the packaging close until you finish building and make sure everything works. The packaging protects parts while you organize them and helps if you need to show shipping damage.
Assemble the RitFit M2 3D Step by Step
1. Build the main frame
Build the base, uprights, and crossmembers in the order shown in the manual. Start each bolt by hand and leave it slightly loose. This lets the frame move as you line up the next parts.
Make sure the left and right parts are in the right spots. Always check the diagrams before attaching a part, especially if pieces look alike. After you build the main frame, use a level to check that it sits flat on the floor. Tighten the hardware only once everything is lined up.
2. Add the plate carriage and cable parts
The M2 3D uses a plate-loaded system. Put in the carriage, pulleys, and cables in the order shown in the manual. Follow each cable’s path carefully. If a cable goes on the wrong side of a pulley or frame part, it can cause friction or make the movement uneven.
Make sure each pulley turns easily, and the cable sits in its groove. Don’t force a cable into place or change its path just to make it fit. If anything looks different from the diagram, stop and check the manual before you continue.
3. Install the 3D Smith attachment
The 3D Smith assembly has its own section in the M2 manual. Use that section instead of the instructions for the regular Smith attachment. Put the Smith parts together carefully, and make sure the bar and brackets match the diagrams.
Before you add any plates, move the bar through its full range without weight. Make sure it moves smoothly, and both sides move together. If the bar sticks, sits unevenly, or catches, stop and check the assembly. Don’t try to fix alignment problems by bending or changing parts.
4. Fit the remaining parts and accessories
Attach the safety arms, hooks, handles, and any other parts that came with your package, as the instructions say. Only use accessories that fit, and make sure every pin or attachment is fully in place before you use the machine.
This package comes with a bench and plates. Put these together and check them using their own instructions. The M2 package listing says that contents can vary, so double-check what you bought instead of assuming every pictured item is included.
5. Tighten and inspect the frame
After you install the frame, Smith attachment, and cables, go over all the hardware one last time. Tighten everything as the manual says. As you tighten, check again that the frame stays level and square.
Don’t skip this step. Loose hardware can make the machine unstable and affect how the moving parts work.
Test the Machine Before Your First Workout
Start by leaving the machine unloaded for your first test. Move the Smith bar slowly through its full range of motion. Check the hooks, safety arms, and adjustment points. Next, test each cable station with a light load and watch how the pulleys and cables move.
Listen for grinding, scraping, or repeated clicking. Watch for cables rubbing against the frame, wobbly pulleys, or uneven movement. If you spot a problem, stop using that part of the machine until you figure out the cause or get help from RitFit.
For your first workout, use a light load and get used to how the 3D bar moves. Set the safety points before each exercise. The M2 specs list a 33-pound Smith bar and model-specific capacity ratings. Check the latest M2 technical specs and your manual before loading the machine, and never exceed the limit on any part.
Keep Your RitFit M2 3D in Good Shape
Regular checks help you catch wear before it turns into a bigger problem. RitFit’s manual recommends inspecting and tightening parts before use, checking for damage or wear often, and lubricating moving parts when needed. Monthly lubrication is a good general rule, but your needs may vary depending on how much you use the machine.
After each workout
Wipe sweat off the bar, handles, bench, and any other surfaces you touched. Remove dust or chalk from areas where it can collect. A quick clean keeps the machine usable and makes wear easier to spot.
During regular inspections
Check all visible bolts, pins, hooks, and safety arms for looseness or damage. Check the cables for fraying, peeling, extra slack, or rough movement. Make sure the pulleys turn smoothly and don’t rub against the frame.
Wipe the guide rods and moving surfaces with a clean cloth. Only use the lubricants and methods RitFit recommends for each part. Don’t guess—using the wrong product can attract dirt or change how the surface moves.
When to Stop and Ask for Help
If you find a damaged cable, a loose or damaged part, a missing fastener, or a Smith bar that sticks or moves unevenly, stop using the machine. Don’t use substitute parts, bend anything, or keep training if there’s a problem. Contact RitFit for help or replacement parts. The manual lists support@ritfitsports.com for customer service.
A Simple Routine Makes Maintenance Easier
The RitFit M2 3D has many parts, but maintenance doesn’t have to be hard. Clean it after each workout, check it regularly, and address any odd movement or visible wear right away. Above all, follow the manual for your specific model and package.
Careful assembly sets you up for success. Regular checks help keep the Smith bar, cables, and frame ready for your next workout.
RitFit M2 3D Smith Machine Package: Pros and Cons
The RitFit M2 3D Smith Machine Package brings together a power rack, a Smith machine with front-to-back movement, and cable training in one home gym setup. It offers plenty of exercise options, but consider its size and some design trade-offs before buying.
Pros
- You can train in several ways with this one machine. Use the rack for barbell lifts, the Smith bar for guided movements, and the cable system for rows, flyes, curls, and triceps work. The setup also has pull-up and landmine stations. Package contents may vary, so check which version you’re getting before you order.
- The 3D Smith bar moves up and down and also allows some front-to-back movement. This can make bench presses and bent-over rows feel more natural than with a fixed-path Smith machine. You can also lock it into a straight vertical path if you prefer.
- This machine saves space compared to having separate stations. It combines several training stations in one unit. You’ll still need some room around it, but it can help you set up a versatile home gym without buying multiple machines.
- You can adjust the setup for different exercises and users. The M2 has several adjustment positions for its main uprights, cable pulleys, and 3D Smith bar. This lets you set the rack and pulleys at the right height for different movements.
- You can build a varied full-body routine. The rack, cables, pull-up station, and landmine give you options for both upper- and lower-body training. Switch between strength lifts and accessory work without needing another machine.
- The cables let you do a variety of movements. The dual cable system supports exercises like rows, flyes, curls, and triceps work. Its 2:1 pulley ratio feels different from lifting the full weight of a plate-loaded bar.
- You can choose from different configurations. The M2 offers options with a 3D Smith bar or a fixed-path Smith bar, plus weight-stack versions. This helps you pick a setup that fits your training style and budget.
- The M2 has a sturdy frame for home strength training. It uses 13-gauge steel uprights and has a maximum load capacity of 2,000 pounds. Follow the manual and use the safety parts as instructed.
- Keep your plates close by. Six plate-storage bars help you organize your weights near the rack.
- Use the safety arms and J-hooks for rack work. These features support barbell training when set up and used as directed.
Cons
- The 3D Smith feature isn’t ideal for every lift. The extra movement can help with some presses and rows, but squats and overhead presses might feel less comfortable. Think of it as another training option, not an upgrade for every exercise.
- The rack uses nonstandard sizing, so the M2’s upright size might limit your options for third-party attachments. If you want to expand your setup, check if attachments will fit before you buy.
- Assembly can take a while. The machine has lots of parts, and some people may find the instructions tricky. Set aside enough time and ask someone to help with the bigger pieces.
Overall, the RitFit M2 3D Smith Machine Package could be a good fit if you want one home gym system for rack work, cable exercises, and guided-bar training. Its main strengths are the variety of stations and the extra movement the Smith bar offers. Before you decide, make sure it fits your space, check which accessories are included, and confirm the attachment sizes match your plans.
RitFit M2 3D Smith Machine Review: Optimize Your Workouts
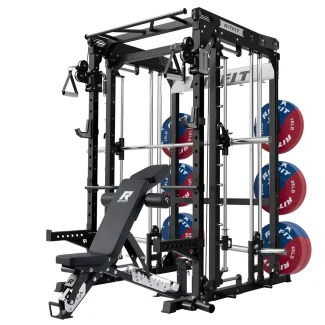
In this review, we focused on what makes a home gym worth the space. The RitFit M2 3D Smith Machine Package delivers on that promise. It combines a 3D Smith machine, a power rack, and a cable station, so you get several training options without crowding your room with separate machines.
What Makes the 3D Smith Bar Different?
A regular Smith bar moves up and down on a fixed track. The M2 3D bar also moves forward and backward within its guided path. This extra movement can feel more natural for squats, presses, and rows. Remember, it’s still a guided bar, not a free barbell, so good form and using a sensible load are still important.
More Than a Smith Machine
The M2 3D also includes a power rack, cable crossover, pull-up bar, low row, and landmine. You can use this one setup for heavy lifts, cable exercises, and smaller accessory work. The cables are plate-loaded, so this version is best if you already have Olympic plates or plan to get them.
Check Your Space Before You Buy
RitFit lists the M2 as 78.7 inches long, 68.75 inches wide, and 86.14 inches high. The Smith bar weighs 33 pounds, and the cables have a 2:1 pulley ratio. Measure extra space around the frame—you’ll need room to load plates, move a bench, use the cables, and do pull-ups.
Package contents can vary. In addition to the power rack and cable crossover, our package includes the RitFit GATOR weight bench and a 370-lb Olympic weight-plate set.
Is the RitFit M2 3D Right for You?
The M2 3D is a good choice if you want a more flexible guided bar path and don’t mind loading plates for cable work. It offers lots of training options in one frame, but you’ll still need enough space to use them comfortably.
Ready to plan your setup? Click here to see the current price and availability of the RitFit M2 3D Smith machine package.
Important Safety Note:
Before starting any new exercise program or using new equipment, check with your doctor to make sure it’s safe for you. This is especially important if you have any medical or physical conditions that could affect your ability to exercise or put your health at risk. If you take medication that affects your heart rate, blood pressure, or cholesterol, your doctor’s advice is key to creating a workout plan that fits your needs.
Share Your Thoughts and Questions
I hope this detailed review of the RitFit M2 3D Smith Machine package was helpful. Please share your thoughts and questions. Have you used the RitFit R2 3D or similar machines? Your insights can help others make better decisions. I also welcome feedback on my website and suggestions for future content. Your input helps build a helpful, supportive community.
I look forward to hearing from you and continuing the conversation!
You May Also Like
RitFit BPC06 Smith Machine Review: Your Fitness Center at Home
RitFit Buffalo Smith Machine Package Review: Strength Training
Mikolo ANUBIS 2.0 Ultimate Smith Machine Review: Is it the Best?